


Announcing the official GraphCMS integration for Vercel!
We've just rolled out our official GraphCMS - Vercel integration!
Learn More →
August 12, 2020
NextJs is a powerful framework that lets us combine the best of server-side execution and static site generation. Out of the box we get server-rendered content, static resource compilation and API routes ensuring a protected execution environment.
Why that’s important for us is that we are able to handle our user authentication and Auth0 code in server-side routes where our Auth0 Client secret is protected from our app’s users, while still getting access to really fast pages loading content that doesn’t need to check the server first.
All of the code has been written already in this example repo, but we’ll look at the different parts of the framework to get a better understanding of how it works.
To begin with, you’ll need to provide your own application variables. We’ll be assuming that our code is deployed to Vercel as that is what this tutorial recommends, but the choice is up to you.
First, start by creating a copy of the .env.local.template file and rename it to .env.local
cp ./env.local.template .env.local
Returning to the Auth0 console and navigate to your application, you’ll need:
AUTH0_CLIENT_SECRET
AUTH0_CLIENT_ID
AUTH0_DOMAIN
Additionally, you’ll need to define a random secret for the SESSION_COOKIE_SECRET as well as the SESSION_COOKIE_LIFETIME
Lastly, you’ll need to define HASURA_ADMIN_SECRET which will be used to protect your login if you choose not to use Hasura Cloud.
We define all of these values in a file called “.env.local” because we will define all of the values again in our Vercel admin panel for our project. NextJs supports naming files .env.[environment] as a pattern for mapping specific environment variables to those Node environments. It looks for these files out of the box. The .local prefix is a reminder for us to not push this file into source control (ie. Github).
All of the needed pages for the demo exist already in the project repository, but for an explanation, we’ll describe them here.
Our config file declares various export values for use throughout our application. Because we are using sever side and client side authentication, we need to define different variables for different contexts. Because we are hosting in Vercel, we need to handle some work-around behaviour to handle our preview URLs (branch deploys) vs our aliased production URL.
if (typeof window === "undefined") {/*** Settings exposed to the server.*/const url = (production, branch, local) => {switch (process.env.NODE_ENV) {case "production":return production;break;case "preview":return branch;break;case "development":return local;break;default:return local;break;}};const base = url("YOUR_LIVE_VERCEL_APP_ALIAS",`https://${process.env.VERCEL_URL}`,"http://localhost:3000");module.exports = {AUTH0_CLIENT_ID: process.env.AUTH0_CLIENT_ID,AUTH0_CLIENT_SECRET: process.env.AUTH0_CLIENT_SECRET,AUTH0_SCOPE: "openid profile",AUTH0_DOMAIN: process.env.AUTH0_DOMAIN,REDIRECT_URI: base + "/api/callback",POST_LOGOUT_REDIRECT_URI: base,SESSION_COOKIE_SECRET: process.env.SESSION_COOKIE_SECRET,SESSION_COOKIE_LIFETIME: process.env.SESSION_COOKIE_LIFETIME,};} else {/*** Settings exposed to the client.*/module.exports = {AUTH0_CLIENT_ID: process.env.AUTH0_CLIENT_ID,AUTH0_SCOPE: "openid profile",AUTH0_DOMAIN: process.env.AUTH0_DOMAIN,REDIRECT_URI: `${window.location.origin}/api/callback`,POST_LOGOUT_REDIRECT_URI: window.location.origin,};}
The URL helper function simply allows us to define which base-url will be used in the various Node environments such as preview, development and local.
Note how we don’t expose our AUTH0_CLIENT_SECRET in our client context, but only in the server? This is part of what makes a framework like NextJS so powerful is the ability to mix contexts like this.
The auth0 file in our lib creates a new configuration object for the Auth0 SDK. It creates all the required configurations and methods we’ll need to work directly with Auth0, and then exports it for use in other files.
import { initAuth0 } from "@auth0/nextjs-auth0";import config from "./config";const auth0Instance = initAuth0({clientId: config.AUTH0_CLIENT_ID,clientSecret: config.AUTH0_CLIENT_SECRET,scope: config.AUTH0_SCOPE,domain: config.AUTH0_DOMAIN,redirectUri: config.REDIRECT_URI,audience: "YOUR_HEROKU_APP_URL",postLogoutRedirectUri: config.POST_LOGOUT_REDIRECT_URI,session: {cookieSecret: config.SESSION_COOKIE_SECRET,cookieLifetime: config.SESSION_COOKIE_LIFETIME,storeIdToken: true,storeRefreshToken: true,storeAccessToken: true,},});export default auth0Instance;
This is highly specific React code and will be covered in the NextJs tutorial. The basic gist of this code is that it implements a React hook to check our /api/me route if the user is still logged-in, if they are, it returns our user data, if not, it redirects a user to a login path and additionally includes some helper state to determine if the browser is still checking for our logged-in status.
Our login function takes a request to the route /api/login from our website, which then in turn uses our Auth0 lib to send all the client ID and secret information we need to Auth0 along with a secondary parameter called “redirectTo” which is the url that should be called from Auth0’s servers after we succeed or fail to log-in to the app.
import auth0 from "../../lib/auth0";export default async function login(req, res) {try {await auth0.handleLogin(req, res, {redirectTo: req.headers.referer + "api/callback",});} catch (error) {console.error(error);res.status(error.status || 500).end(error.message);}}
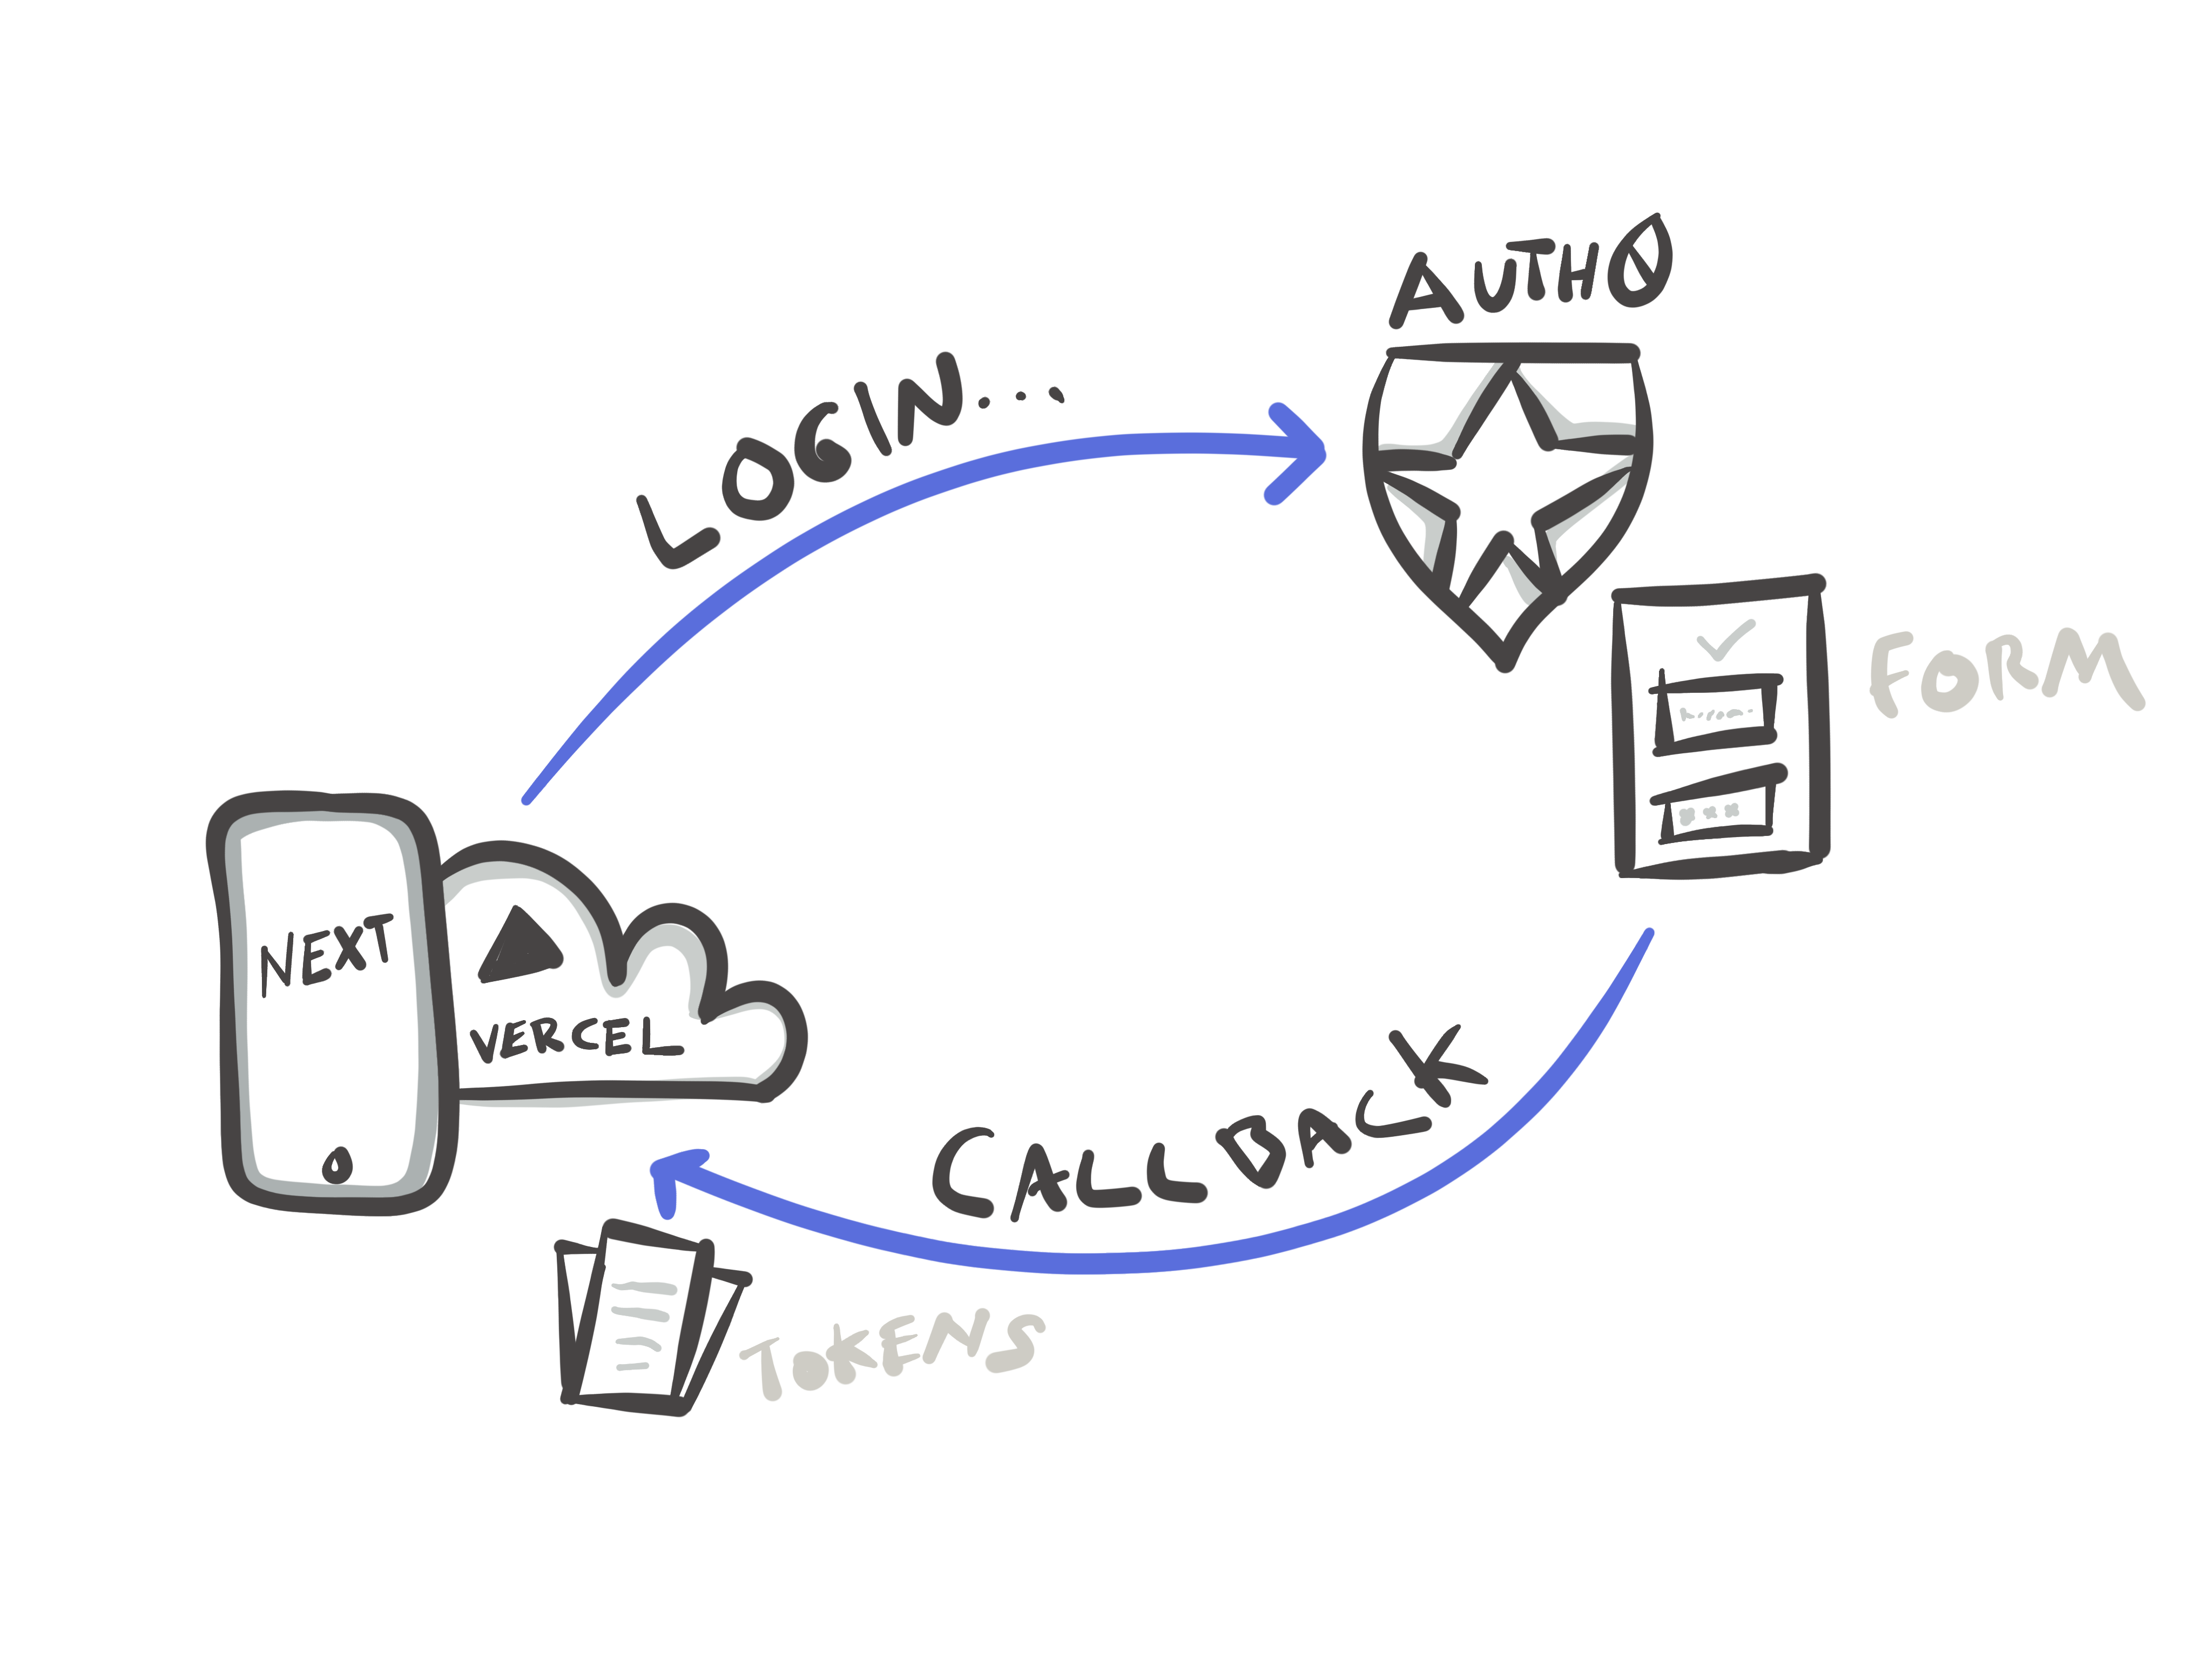
Our callback URL handles a request coming FROM Auth0, more specifically, this is a callback that is invoked when a user tries to signup. See the diagram below.
Our application tries to login, which sends us to Auth0, Auth0 uses a form from their server (in our case) which then sends us back to our callback url that we defined in our login request above. If we had a successful login, that request has tokens corresponding the scopes we requested and whether or not we want to use refresher tokens. Because there can be any number of tokens depending on our settings, the Auth0 library is able to simply take the request coming back from the Auth0 servers, identify which parts are important for our authentication, and save them where they need to go in our browser.
That code looks like this:
import auth0 from "../../lib/auth0";export default async function callback(req, res) {try {await auth0.handleCallback(req, res, { redirectTo: "/" });} catch (error) {console.error(error);res.status(error.status || 500).end(error.message);}}
This route is perhaps the most opaque in terms of understanding the inner workings of the code, but the concept is straight forward. The SDK checks to see if the user still has a valid token to access data from Auth0, if not, it uses the refresh token to generate a new one.
import auth0 from "../../lib/auth0";export default async function me(req, res) {try {await auth0.handleProfile(req, res);} catch (error) {console.error(error);res.status(error.status || 500).end(error.message);}}
In a near mirror of our callback code, the Auth0 SDK takes a the request to logout and simply removes all the cookies for logging in and ensures no protected content is accessible anymore.
import auth0 from "../../lib/auth0";export default async function logout(req, res) {try {await auth0.handleLogout(req, res);} catch (error) {console.error(error);res.status(error.status || 500).end(error.message);}}
We won’t bother outlining the remaining files in NextJs here as they pertain to the presentational layer and edge of out of the scope of this tutorial.
Generally speaking, the actual rendered pages will include a function that follows a similar pattern as the following code snippet.
export async function getServerSideProps({ req, res }) {// Here you can check authentication status directly before rendering the page,// however the page would be a serverless function, which is more expensive and// slower than a static page with client side authenticationconst session = await auth0.getSession(req);if (!session || !session.user) {res.writeHead(302, {Location: "/api/login",});res.end();return;}const resp = await fetch("https://hasura-fit.herokuapp.com/v1/graphql", {method: "POST",headers: {Authorization: `Bearer ${session.accessToken}`,},body: JSON.stringify({query: `{sessions {created_atworkout(stage: PUBLISHED, where: {}) {title}}}`,}),});const { data } = await resp.json();return { props: { sessions: data.sessions, user: session.user } };}
The specific function here getServerSideProps allows us to guarantee a server-side execution which means privileged access. That’s why we are able to use our authorization header here in the same file as our rendered page because we know this part of the code only runs on the server. This is one of the hidden powers of NextJs.
In the above code, our server will look for a valid session rookie, if it doesn’t find one, it will return us to the login page, otherwise, it will execute a request with our auth token that originally came from Auth0 and is intended for use at Hasura. It will read all the data about my user’s workout session activity, and then, through the remotely joined schema, Hasura will also look up the workout data itself (the title) directly from GraphCMS but resolve it to us in one unified server.
One last “complex” query that deserves a special mention is the following code:
fragment Rep on RepMovement {titlerepetition}fragment Amrap on AmrapMovement {title}fragment Duration on DurationMovement {titleduration}fragment Circuit on Circuit {repetitionsmovements {... on RepMovement {...Rep}... on AmrapMovement {...Amrap}... on DurationMovement {...Duration}}}query Premium($authed: Boolean!) {workouts(orderBy: popularity_DESC) {titledescriptionpopularityslugimage {url}warmup @include(if: $authed) {... on RepMovement {...Rep}... on AmrapMovement {...Amrap}... on DurationMovement {...Duration}}program @include(if: $authed) {... on RepMovement {...Rep}... on AmrapMovement {...Amrap}... on DurationMovement {...Duration}... on Circuit {...Circuit}}coolDown @include(if: $authed) {... on RepMovement {...Rep}... on AmrapMovement {...Amrap}... on DurationMovement {...Duration}}}}
This code requests the content for our homepage. In this complex query we define re-usable pieces of query (fragments) to be used in multiple locations of our query body. We also pass in a variable called “authed” which has come from a check to see if the user has a valid session. If it does, it includes the workout data, if it doesn’t, it get’s skipped according to the rule defined in the @include directive’s if argument. This way a user can see the title and basic information about a workout program, but not the full “product” data in this case.
This site uses cookies to provide you with a better user experience. For more information, refer to our Privacy Policy
